
Automating Snapshot Blockchain Data
Automating the creation and publication of blockchain data snapshots for a Layer 1 EVM blockchain, focusing on minimizing synchronization times for new nodes while optimizing costs

Problem
Recently, I worked for a company that operates a Layer 1 EVM blockchain. Since the blockchain is public, people are encouraged to run their own nodes for various reasons, such as securing the network, dapps development, ensuring performance and privacy, etc…
The blockchain operates on the principle that every node in the network must synchronize its data with others to ensure proper functionality. People can start their own nodes, but waiting for data to synchronize fully can take weeks, months, or even a year (in the case of an archive node, a specific type of node in the blockchain). This lengthy process is unacceptable!
A common node type is the full node, containing over 800 GiB of data. Another type is the archive node, which contains nearly 4 TiB at the time of writing this post and continues to grow. As the main operator of the blockchain, we, the company, must provide chain data as regular snapshots and share them publicly. This allows everyone to download the snapshot and start syncing from where it left off at its creation time. Consequently, new nodes can quickly catch up with the chain.
My task is to find a way to achieve this with the following requirements:
The process of creating and publishing snapshots must be automated
The automation must support both scheduled and instant triggers
The size of the snapshot must be reduced as much as possible
Storage and transfer costs must be considered as well
Solution
Before delving into the details of how the problem was resolved based on the given requirements, it’s important to clarify a few key points.
First, as most of the company’s infrastructure runs on AWS, the solution will primarily leverage AWS services. However, the solution remains flexible, allowing for the use of other providers if they offer better services
Second, chain data snapshots are provided to the community free of charge, with no costs for downloading them. Therefore, the expense of storing and sharing these snapshots must be a critical consideration, especially when using public cloud services
Imagine a node running as a container on an EC2 instance. This instance has two EBS volumes: one for OS data and another for chain data, mounted at /mnt/chaindata. The instance is launched from an existing AMI containing chain data, but it's far behind the current blockchain state
Let's examine the entire process before discussing its automation:
Launch the EC2 instance from the existing AMI
Start the node container with the correct configurations
Wait for the container to fully sync data from the network, catching up to the current state
Stop the container
Compress the chain data directory with the highest possible compression ratio
Upload compressed file(s) to public object storage for anyone to download
Terminate the EC2 instance
To enhance the process and accelerate step #3 in subsequent runs, a new AMI should be created before terminating the instance in step #7. This approach reduces the amount of data needing synchronization in future runs, thus decreasing completion time. Without this optimization, the process would take increasingly longer as chain data continues to grow
Orchestration
Although the process is straightforward, manually repeating it is inefficient. Since the entire process can take days or even weeks to complete, automation is essential. Let's explore some AWS services that offer the ability to automate this process. As we need some form of orchestration, two candidates stand out: Step Functions and Systems Manager Automation (SSM Automation)
Now, let's compare these two to see which one best suits our case
Step Functions is a fully managed service designed for orchestrating microservices, distributed systems, and serverless applications. It's well-suited for building complex workflows and managing state transitions between different AWS services. On the other hand, SSM Automation is a feature within AWS Systems Manager used for automating operational tasks, especially those related to infrastructure and instances. It focuses on automating repetitive tasks
Step Functions is ideal for orchestrating complex workflows with multiple states, branches, and error-handling logic. SSM Automation, while simpler than Step Functions, focuses on running predefined automation documents (SSM runbooks) and workflows related to infrastructure management
The clear choice here is SSM Automation because it's a simple, out-of-the-box solution for routine tasks, where the goal is to automate repetitive operational tasks with predefined runbooks
Storage
For the storage component, AWS S3 might seem like the obvious choice. However, considering cost factors, Cloudflare R2 will be used instead due to its significantly lower pricing. Let's examine the two primary cost dimensions of using object storage: storage cost and data transfer cost (also known as egress cost)
To see how much we can save, let's look at an example. Say we store 5 TB of data a month, and there are 5 people, each downloading 5 TB of data. This totals 25 TB of data transfer in a month
Now you can see the significant cost savings. This example assumes only 5 full downloads per month. Imagine the savings if there were tens, hundreds, or thousands of downloads!
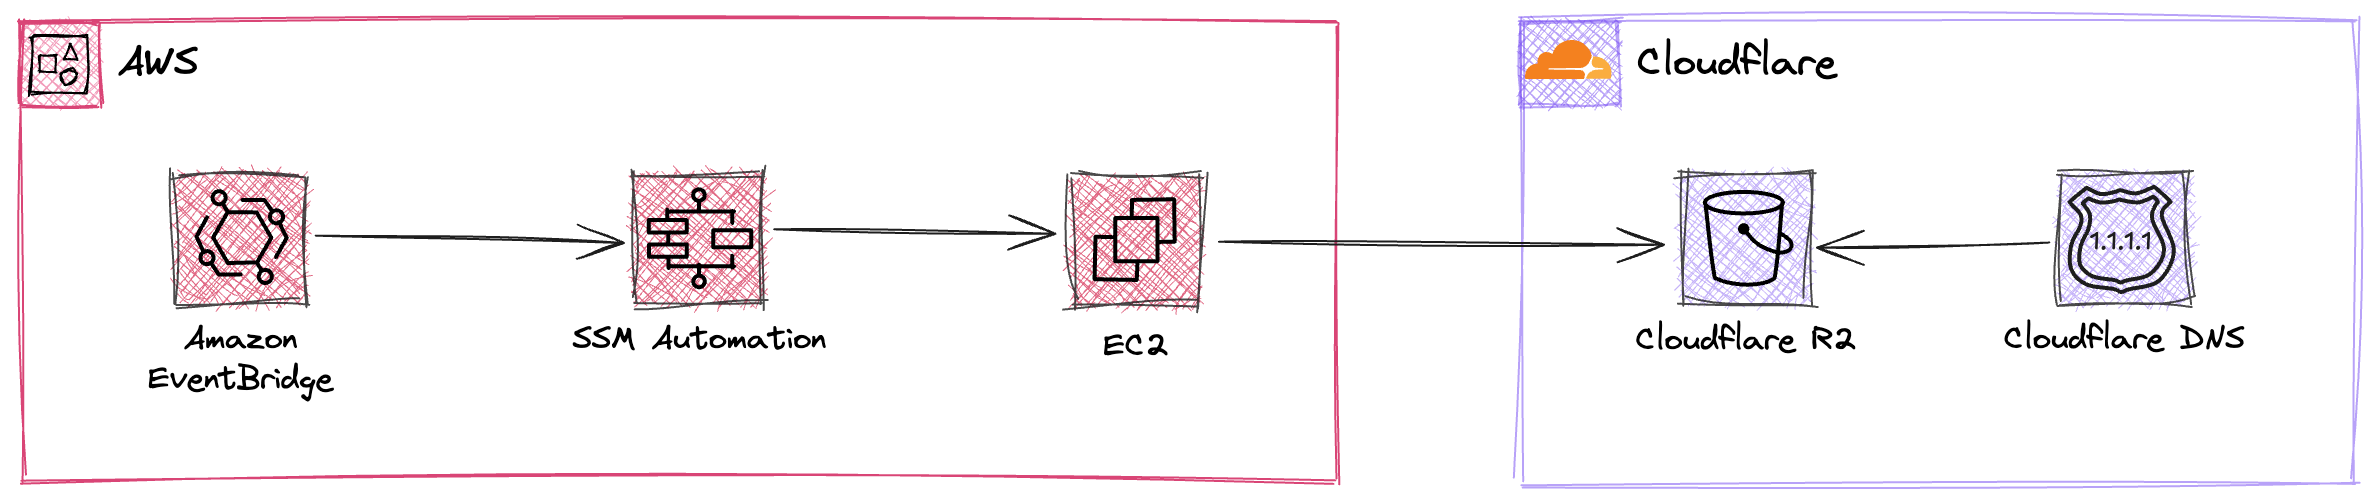
Finally, in order to provide scheduled triggers ability, Amazon Event Bridge will be utilized
Architecture
The diagram below illustrates the solution at a high level
SSM Automation
Now, let's dive deep into the heart of the solution: the SSM Automation runbook
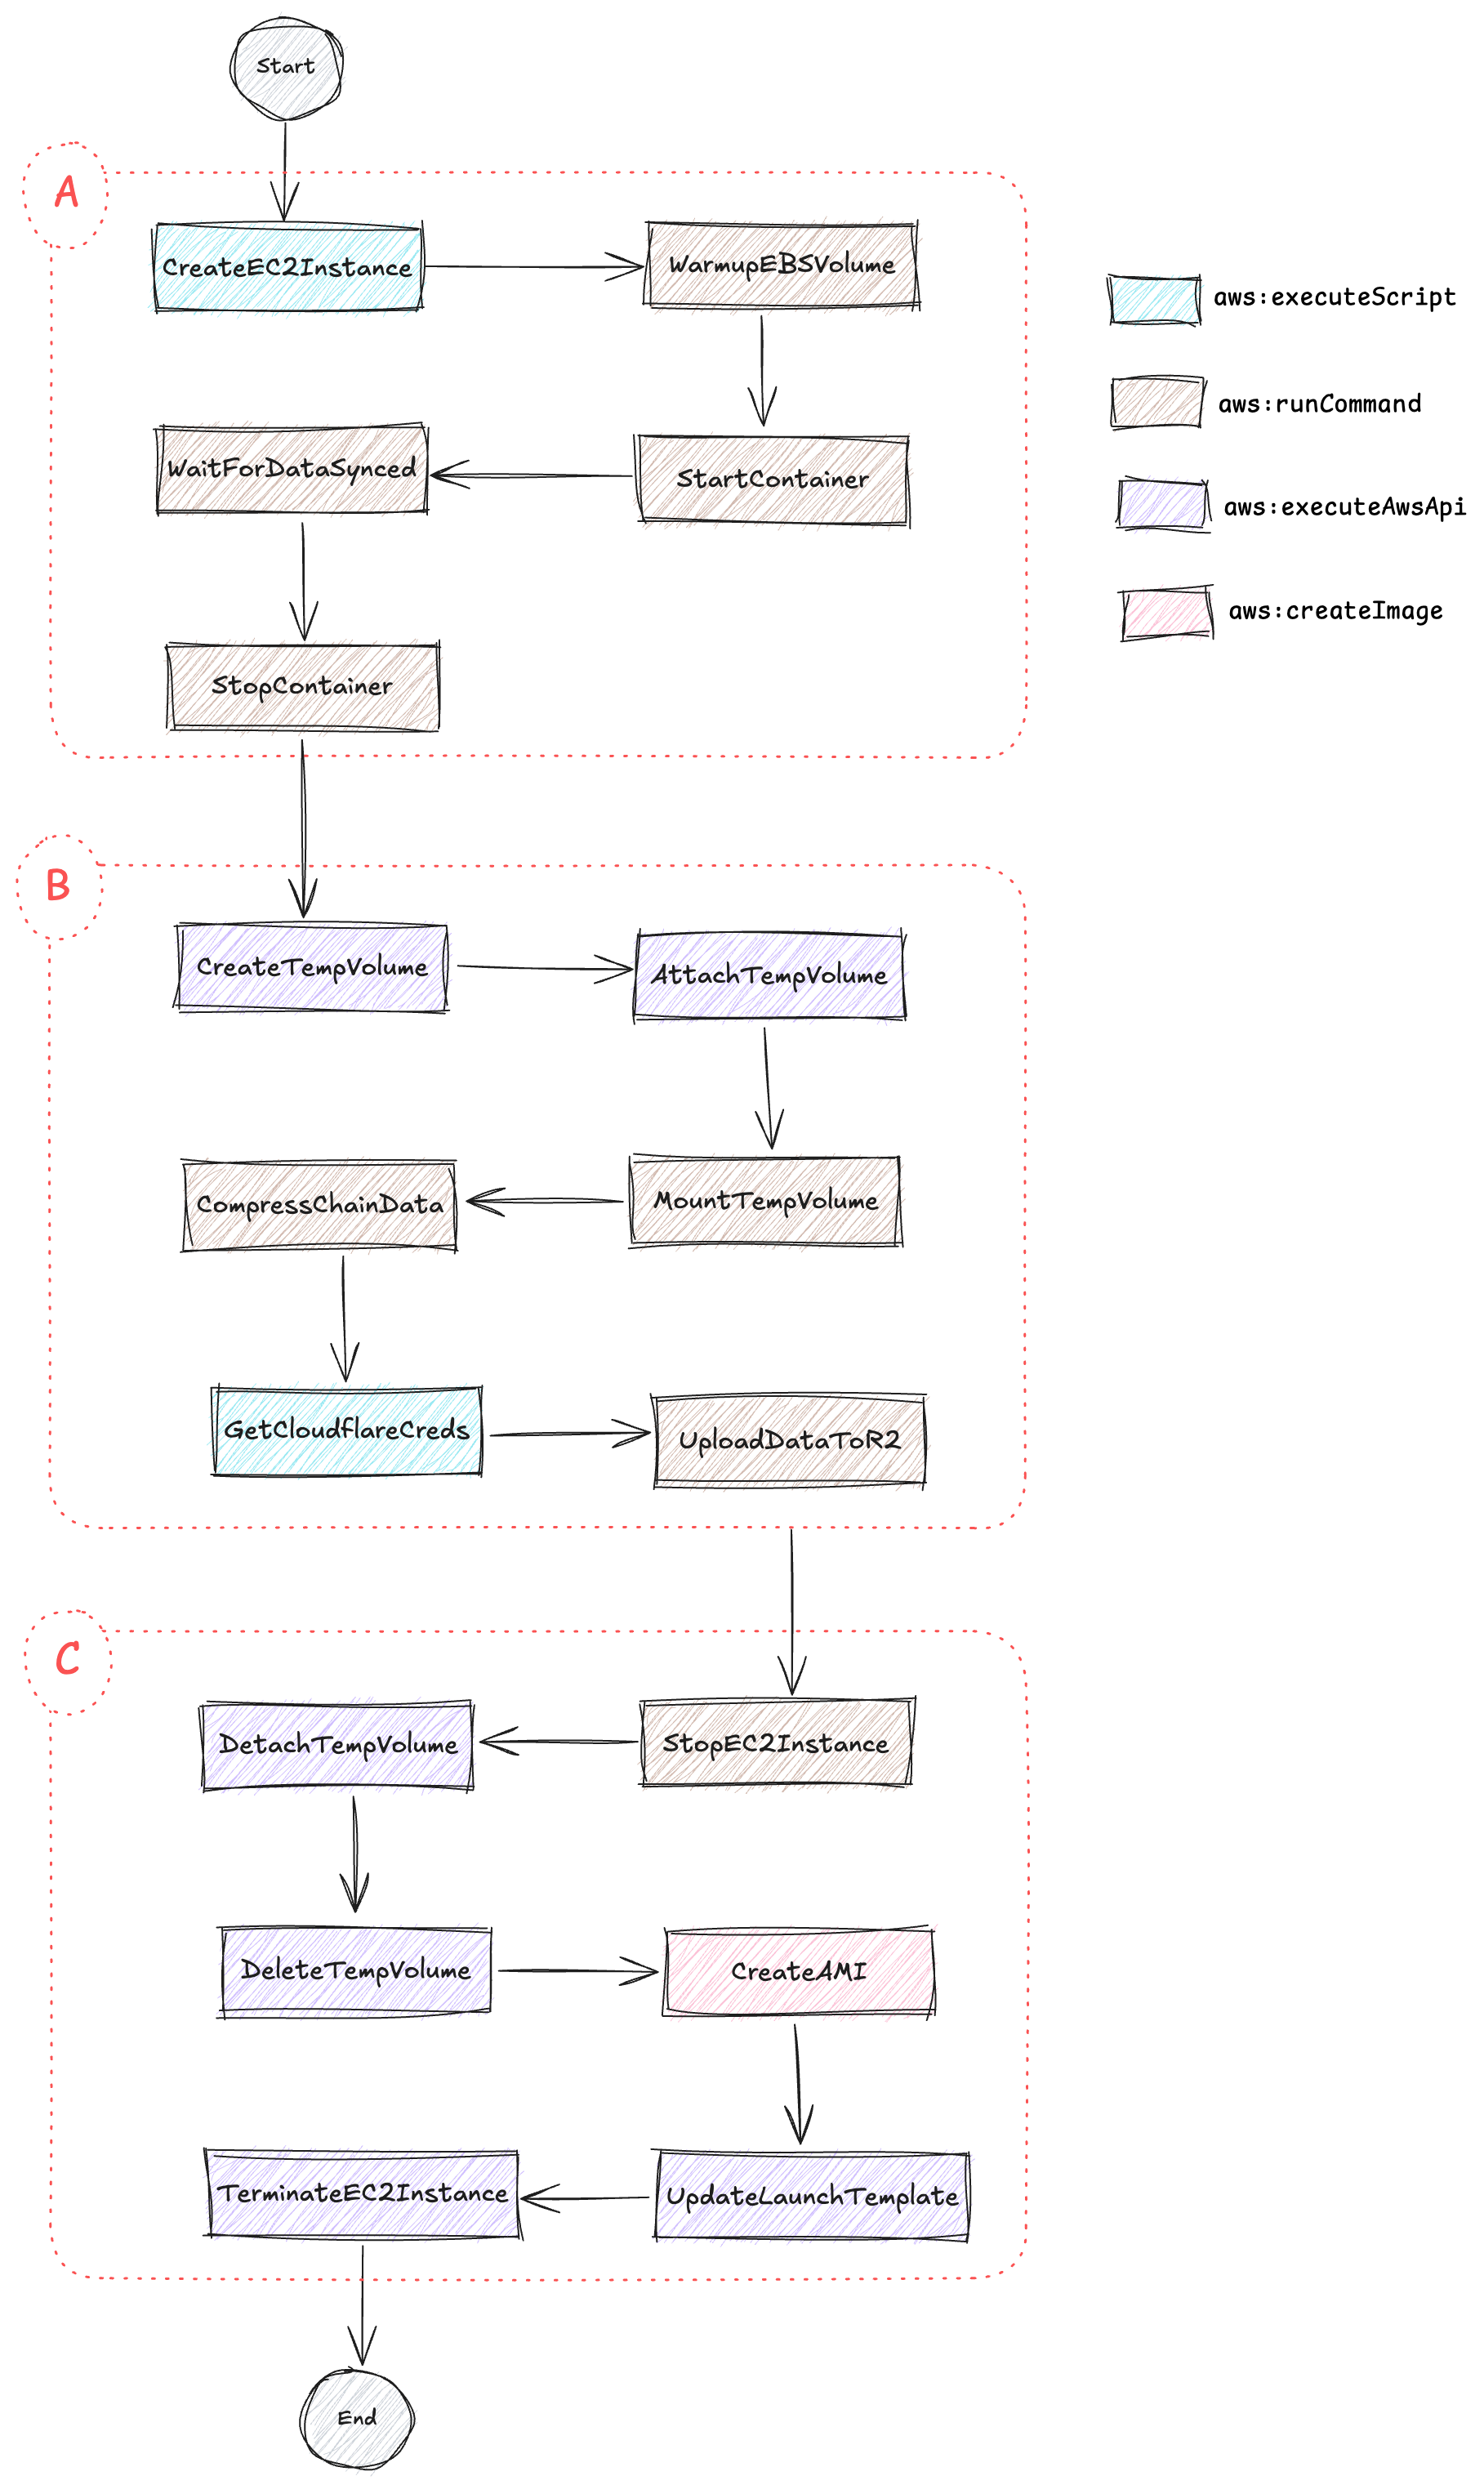
As you can see, the runbook consists of several steps divided into three main stages. Please note that I have hidden some unimportant steps to simplify the diagram. I will mention them when we go into the details of the runbook
The first stage
The first stage involves provisioning the EC2 instance and syncing chain data.
You'll notice that the CreateEC2Instance step uses the aws:executeScript action. Why isn't aws:executeAwsApi used for simplicity? It's because the EC2 instance will be created from a predefined launch template, and achieving this with aws:executeAwsApi isn't straightforward. Look at the code snippet below to see how the step is defined in the runbook:
- name: CreateEC2Instance
  action: aws:executeScript
  nextStep: WaitForInstanceRunning
  timeoutSeconds: 300
  inputs:
    Runtime: python3.8
    Handler: script_handler
    InputPayload:
      launch_template_name: "{{ LaunchTemplateName }}"
      launch_template_version: "$Latest"
      subnet_id: "{{ SubnetId }}"
    Script: |
      import boto3

      ec2 = boto3.session.Session().resource('ec2')

      def script_handler(events, context):
          instance = ec2.create_instances(
              LaunchTemplate={
                  'LaunchTemplateName': events['launch_template_name'],
                  'Version': events['launch_template_version'] if 'launch_template_version' in events else '$Latest',
              },
              SubnetId=events['subnet_id'],
              MaxCount=1,
              MinCount=1,
          )
          print(f'EC2 instance created: {instance[0].instance_id}')
          return { 'instance_id': instance[0].instance_id }
The step CreateEC2Instance will return the ID of the created instance, which will be used in later steps. Since the newly created instance takes some time to be ready before it can be accessed, we need to wait for it. That's why the next step is WaitForInstanceRunning. This is straightforward by using the action aws:waitForAwsResourceProperty. Let's take a look at how it's implemented:
- name: WaitForInstanceRunning
  action: aws:waitForAwsResourceProperty
  nextStep: WarmupEBSVolume
  timeoutSeconds: 300
  inputs:
    Service: ec2
    Api: DescribeInstances
    InstanceIds: ["{{ CreateEC2Instance.InstanceId }}"]
    PropertySelector: "$.Reservations[0].Instances[0].State.Name"
    DesiredValues: [running]
The next step is WarmupEBSVolume. You may wonder why this is necessary. This is because an EC2 instance created from an existing AMI with chain data comes from an EBS snapshot associated with the AMI. EBS snapshots use lazy loading, meaning the actual data is downloaded to the volume only when it's first accessed. This can cause issues when the blockchain node container initializes. Therefore, we need to ensure that all data is downloaded into the volume before starting the container. There is a fio process running in the background to read every block of the volume. The process is triggered when the instance first boots using the following command in the user data script:
fio --filename=/dev/sdf --rw=read --bs=100M --iodepth=32 --ioengine=libaio --direct=1 --name=volume-initializeAnd here’s how the step is implemented:
- name: WarmupEBSVolume
  action: aws:runCommand
  nextStep: StartContainer
  onCancel: step:TerminateEC2Instance
  onFailure: step:TerminateEC2Instance
  timeoutSeconds: 176400 # 49h
  maxAttempts: 2 # max ~2 days
  inputs:
    DocumentName: AWS-RunShellScript
    Parameters:
      executionTimeout: "172800" # max 48h
      workingDirectory: /tmp
      commands:
      - |-
        #!/bin/bash

        WARMUP_VOLUME_TIMEOUT=169200 # 47 hours
        IS_WARMUP_VOLUME=true

        ELAPSED=0
        while [[ "$IS_WARMUP_VOLUME" != "false" ]];
        do
          ELAPSED=$((ELAPSED+60))
          if [[ "$ELAPSED" -le "$WARMUP_VOLUME_TIMEOUT" ]]
            then
              # Wait 60 seconds
              sleep 60
              IS_WARMUP_VOLUME=`pgrep -x fio > /dev/null && echo true || echo false`
          elif [[ "$ELAPSED" -gt "$WARMUP_VOLUME_TIMEOUT" ]]
            then
              exit 1
          fi
        done
    InstanceIds: ["{{ CreateEC2Instance.InstanceId }}"]
The remaining three steps (StartContainer, WaitForDataSynced, StopContainer) of the first stage are specific to the blockchain. I will not show the details here, but based on what we've seen so far, implementing them is straightforward, and the approach is the same
The second stage
Now, onto the second stage, which is responsible for uploading the chain data to remote storage, Cloudflare R2 bucket
Since the data will be compressed before uploading, the required volume size will need to be double the size of the chain data. We'll need to create a temporary volume to store the compressed files. Let's do it:
- name: GetEC2InstanceInfo
  action: aws:executeAwsApi
  nextStep: CreateTempVolume
  inputs:
    Service: ec2
    Api: DescribeInstances
    InstanceIds: ["{{ CreateEC2Instance.InstanceId }}"]
  outputs:
  - Name: AvailabilityZone
    Type: String
    Selector: $.Reservations[0].Instances[0].Placement.AvailabilityZone

- name: CreateTempVolume
  action: aws:executeAwsApi
  nextStep: WaitForTempVolumeAvailable
  inputs:
    Service: ec2
    Api: CreateVolume
    AvailabilityZone: "{{ GetEC2InstanceInfo.AvailabilityZone }}"
    Size: "{{ VolumeSize }}"
    VolumeType: gp3
    TagSpecifications:
    - ResourceType: volume
      Tags:
      - Key: Name
        Value: snapshot-chaindata-compressed-volume
      - Key: ssm-automation
        Value: "true"
      - Key: automation-execution
        Value: "{{ automation:EXECUTION_ID }}"
  outputs:
  - Name: VolumeId
    Type: String
    Selector: $.VolumeId
In order to create a new volume, we need to know the Availability Zone of the EC2 instance. It's easy to get this information by inspecting the EC2 instance, as shown in the snippet above
The next steps are to attach the temporary volume to the instance and make it visible to the OS as a file system:
- name: WaitForTempVolumeAvailable
  action: aws:waitForAwsResourceProperty
  nextStep: AttachTempVolume
  timeoutSeconds: 300
  inputs:
    Service: ec2
    Api: DescribeVolumes
    VolumeIds: ["{{ CreateTempVolume.VolumeId }}"]
    PropertySelector: "$.Volumes[0].State"
    DesiredValues: [available]

- name: AttachTempVolume
  action: aws:executeAwsApi
  nextStep: WaitForTempVolumeAttached
  inputs:
    Service: ec2
    Api: AttachVolume
    VolumeId: "{{ CreateTempVolume.VolumeId }}"
    InstanceId: "{{ CreateInstance.InstanceId }}"
    Device: /dev/sdg

- name: WaitForTempVolumeAttached
  action: aws:waitForAwsResourceProperty
  nextStep: MountTempVolume
  timeoutSeconds: 300
  inputs:
    Service: ec2
    Api: DescribeVolumes
    VolumeIds: ["{{ CreateTempVolume.VolumeId }}"]
    PropertySelector: "$.Volumes[0].State"
    DesiredValues: [in-use]

- name: MountTempVolume
  action: aws:runCommand
  nextStep: CompressChainData
  inputs:
    DocumentName: AWS-RunShellScript
    Parameters:
      executionTimeout: "60"
      workingDirectory: /tmp
      commands:
      - |-
        set -e
        sudo mkfs -t xfs /dev/nvme2n1
        sudo mkdir -p /mnt/compressed-chaindata
        sudo mount /dev/nvme2n1 /mnt/compressed-chaindata
    InstanceIds: ["{{ CreateEC2Instance.InstanceId }}"]
In order to minimize the size of the data after compression, zstd is used to achieve the best possible compression ratio
- name: CompressChainData
  action: aws:runCommand
  nextStep: CalculateChecksum
  onFailure: Continue
  timeoutSeconds: 86700
  inputs:
    DocumentName: AWS-RunShellScript
    Parameters:
      executionTimeout: "172800" # 48 hours
      workingDirectory: /mnt/chaindata
      commands:
      - |-
        set -e
        cd /mnt/chaindata
        tar -c -I 'zstd -12 -T0' -f /mnt/compressed-chaindata/chaindata.tar.zst .
    InstanceIds: ["{{ CreateEC2Instance.InstanceId }}"]
The next step is to upload the compressed files to the Cloudflare R2 bucket. R2 is S3-compatible, allowing us to use existing tools, including the AWS CLI, to interact with it. The only requirement is to specify a custom endpoint for the CLI. Just like when working with S3, we need a key pair consisting of an access key ID and a secret access key. We will not hardcode these credentials in the runbook; instead, they will be passed through the SSM Parameter Store
- name: GetCloudflareCreds
  action: aws:executeScript
  nextStep: UploadDataToR2
  onCancel: step:TerminateEC2Instance
  onFailure: step:TerminateEC2Instance
  timeoutSeconds: 300
  inputs:
    Runtime: python3.8
    Handler: script_handler
    InputPayload:
      access_key_id: /sanpshot-chaindata/CLOUDFLARE_R2_ACCESS_KEY_ID
      secret_access_key: /sanpshot-chaindata/CLOUDFLARE_R2_SECRET_KEY
    Script: |
      import boto3

      ssm = boto3.session.Session().client(
          service_name='ssm'
      )

      def script_handler(events, context):
          return {
              "access_key_id": get_parameter(name=events['access_key_id']),
              "secret_access_key": get_parameter(name=events['secret_access_key']),
          }

      def get_parameter(name: str) -> str:
          parameter = ssm.get_parameter(
              Name=name,
              WithDecryption=True,
          )
          return parameter['Parameter']['Value']
  outputs:
  - Name: AccessKeyID
    Selector: $.Payload.access_key_id
    Type: String
  - Name: SecretAccessKey
    Selector: $.Payload.secret_access_key
    Type: String

- name: UploadDataToR2
  action: aws:runCommand
  nextStep: StopInstance
  onCancel: step:TerminateEC2Instance
  onFailure: step:StopEC2Instance
  timeoutSeconds: 86700
  inputs:
    DocumentName: AWS-RunShellScript
    Parameters:
      executionTimeout: "86400" # 24 hours
      workingDirectory: /mnt/compressed-chaindata
      commands:
      - |-
        set -e

        export AWS_DEFAULT_REGION=auto
        export AWS_ACCESS_KEY_ID={{ GetCloudflareCreds.AccessKeyID }}
        export AWS_SECRET_ACCESS_KEY={{ GetCloudflareCreds.SecretAccessKey }}

        aws s3 cp --endpoint-url https://<cloudflare-account-id>.r2.cloudflarestorage.com /mnt/compressed-chaindata/chaindata.tar.zst s3://<r2-bucket-name>/chaindata.tar.zst

    InstanceIds: ["{{ CreateEC2Instance.InstanceId }}"]
There are placeholders that you will need to replace with actual values: <cloudflare-account-id>, and <r2-bucket-name>
The last stage
The last stage is to create an AMI before cleaning up created resources
- name: StopEC2Instance
  action: aws:changeInstanceState
  nextStep: DetachTempVolume
  maxAttempts: 2
  timeoutSeconds: 600
  inputs:
    DesiredState: stopped
    InstanceIds: ["{{ CreateEC2Instance.InstanceId }}"]

- name: DetachTempVolume
  action: aws:executeAwsApi
  nextStep: WaitForTempVolumeDetached
  inputs:
    Service: ec2
    Api: DetachVolume
    VolumeId: "{{ CreateTempVolume.VolumeId }}"
    InstanceId: "{{ CreateEC2Instance.InstanceId }}"
    Device: /dev/sdg

- name: WaitForTempVolumeDetached
  action: aws:waitForAwsResourceProperty
  nextStep: DeleteTempVolume
  timeoutSeconds: 300
  inputs:
    Service: ec2
    Api: DescribeVolumes
    VolumeIds: ["{{ CreateTempVolume.VolumeId }}"]
    PropertySelector: "$.Volumes[0].State"
    DesiredValues: [available]

- name: DeleteTempVolume
  action: aws:executeAwsApi
  nextStep: CreateAMI
  inputs:
    Service: ec2
    Api: DeleteVolume
    VolumeId: "{{ CreateTempVolume.VolumeId }}"

- name: CreateAMI
  action: aws:createImage
  nextStep: TagAMI
  timeoutSeconds: 43200
  inputs:
    InstanceId: "{{ CreateEC2Instance.InstanceId }}"
    ImageName: blockchain-node
    ImageDescription: A blockchain node. Created on {{ global:DATE_TIME }}
    NoReboot: true

- name: TagAMI
  action: aws:executeAwsApi
  nextStep: UpdateLaunchTemplate
  inputs:
    Service: ec2
    Api: CreateTags
    Resources: ["{{ CreateAMI.ImageId }}"]
    Tags:
    - Key: Name
      Value: blockchain-node
    - Key: automation-execution
      Value: "{{ automation:EXECUTION_ID }}"

- name: UpdateLaunchTemplate
  action: aws:executeAwsApi
  nextStep: TerminateEC2Instance
  inputs:
    Service: ec2
    Api: CreateLaunchTemplateVersion
    LaunchTemplateName: "{{ LaunchTemplateName }}"
    SourceVersion: "$Latest"
    LaunchTemplateData:
      ImageId: "{{ CreateAMI.ImageId }}"

- name: TerminateEC2Instance
  action: aws:executeAwsApi
  inputs:
    Service: ec2
    Api: TerminateInstances
    InstanceIds: ["{{ CreateEC2Instance.InstanceId }}"]
The UpdateLaunchTemplate step is important. Without this step, the next time the runbook is executed, it will take longer, as the chain data grows over time. With this step, we can significantly reduce the time required
Now that we have gone through the entire runbook, it’s very straightforward with the supported actions of SSM Automation. It is also achievable by other means, such as Ansible. However, since SSM Automation seamlessly integrates with other AWS services and has tracking and auditing features already in place through its UI and CloudTrail, I prefer and highly recommend it over Ansible.
Bonus
As a bonus, here are the IAM policies needed for the runbook:
locals {
  ssm_automation_policies = {
    ec2 = {
      Statement = [
        {
          Effect = "Allow",
          Action = [
            "ec2:DescribeInstances",
            "ec2:DescribeInstanceStatus",
            "ec2:DescribeTags",
            "ec2:CreateVolume",
            "ec2:CreateTags",
            "ec2:AttachVolume",
            "ec2:CreateImage",
            "ec2:DescribeImages",
            "ec2:DescribeVolumes",
            "ec2:DetachVolume",
            "ec2:DeleteVolume",
            "ec2:RunInstances",
            "ec2:TerminateInstances",
            "ec2:CreateLaunchTemplateVersion",
            "ec2:StartInstances",
            "ec2:StopInstances",
          ],
          Resource = "*"
        },
      ]
    }
    ssm = {
      Statement = [{
        Effect = "Allow",
        Action = [
          "ssm:DescribeAssociation",
          "ssm:GetDeployablePatchSnapshotForInstance",
          "ssm:GetDocument",
          "ssm:DescribeDocument",
          "ssm:GetManifest",
          "ssm:GetParameter",
          "ssm:GetParameters",
          "ssm:ListAssociations",
          "ssm:ListInstanceAssociations",
          "ssm:PutInventory",
          "ssm:PutComplianceItems",
          "ssm:PutConfigurePackageResult",
          "ssm:UpdateAssociationStatus",
          "ssm:UpdateInstanceAssociationStatus",
          "ssm:UpdateInstanceInformation",
          "ssm:DescribeInstanceInformation",
          "ssm:SendCommand",
          "ssm:ListCommands",
          "ssm:ListCommandInvocations",
          "ssmmessages:CreateControlChannel",
          "ssmmessages:CreateDataChannel",
          "ssmmessages:OpenControlChannel",
          "ssmmessages:OpenDataChannel",
          "ec2messages:AcknowledgeMessage",
          "ec2messages:DeleteMessage",
          "ec2messages:FailMessage",
          "ec2messages:GetEndpoint",
          "ec2messages:GetMessages",
          "ec2messages:SendReply"
        ],
        Resource = "*"
      }]
    }
    kms = {
      Statement = [
        {
          Effect = "Allow",
          Action = [
            "kms:ListKeys",
            "kms:ListAliases",
            "kms:DescribeKey"
          ],
          Resource = ["arn:aws:kms:*:${data.aws_caller_identity.current.account_id}:alias/aws/ssm"]
        },
      ]
    }
    lambda = {
      Statement = [
        {
          Effect = "Allow",
          Action = [
            "lambda:InvokeFunction"
          ],
          Resource = ["arn:aws:lambda:*:*:function:Automation*"]
        },
      ]
    }
    iam = {
      Statement = [
        {
          Effect = "Allow",
          Action = [
            "iam:PassRole"
          ],
          Resource = [
            module.ec2_instance_role[0].iam_role_arn
          ]
        },
      ]
    }
  }
}
Conclusion
To wrap things up, by tackling long sync times and finding cost-effective solutions, we're keeping things simple and efficient. This automation doesn’t just make life easier for blockchain operators, it also improves the experience for users. Plus, these ideas can easily be applied to a bunch of different use cases, not just in blockchain